Designed to work seamlessly with the Alarm.com platform, the Alarm.com Wi-Fi Chime (ADC-W114C) is a customizable wireless doorbell chime with a compact and antenna-free design. Simply attach the plug adapter, plug the ADC-W114C into a wall outlet, pair with the existing router, add to an account, configure chime rules, and enjoy boosted audio range and instantaneous chime notifications.
Install the ADC-W114C
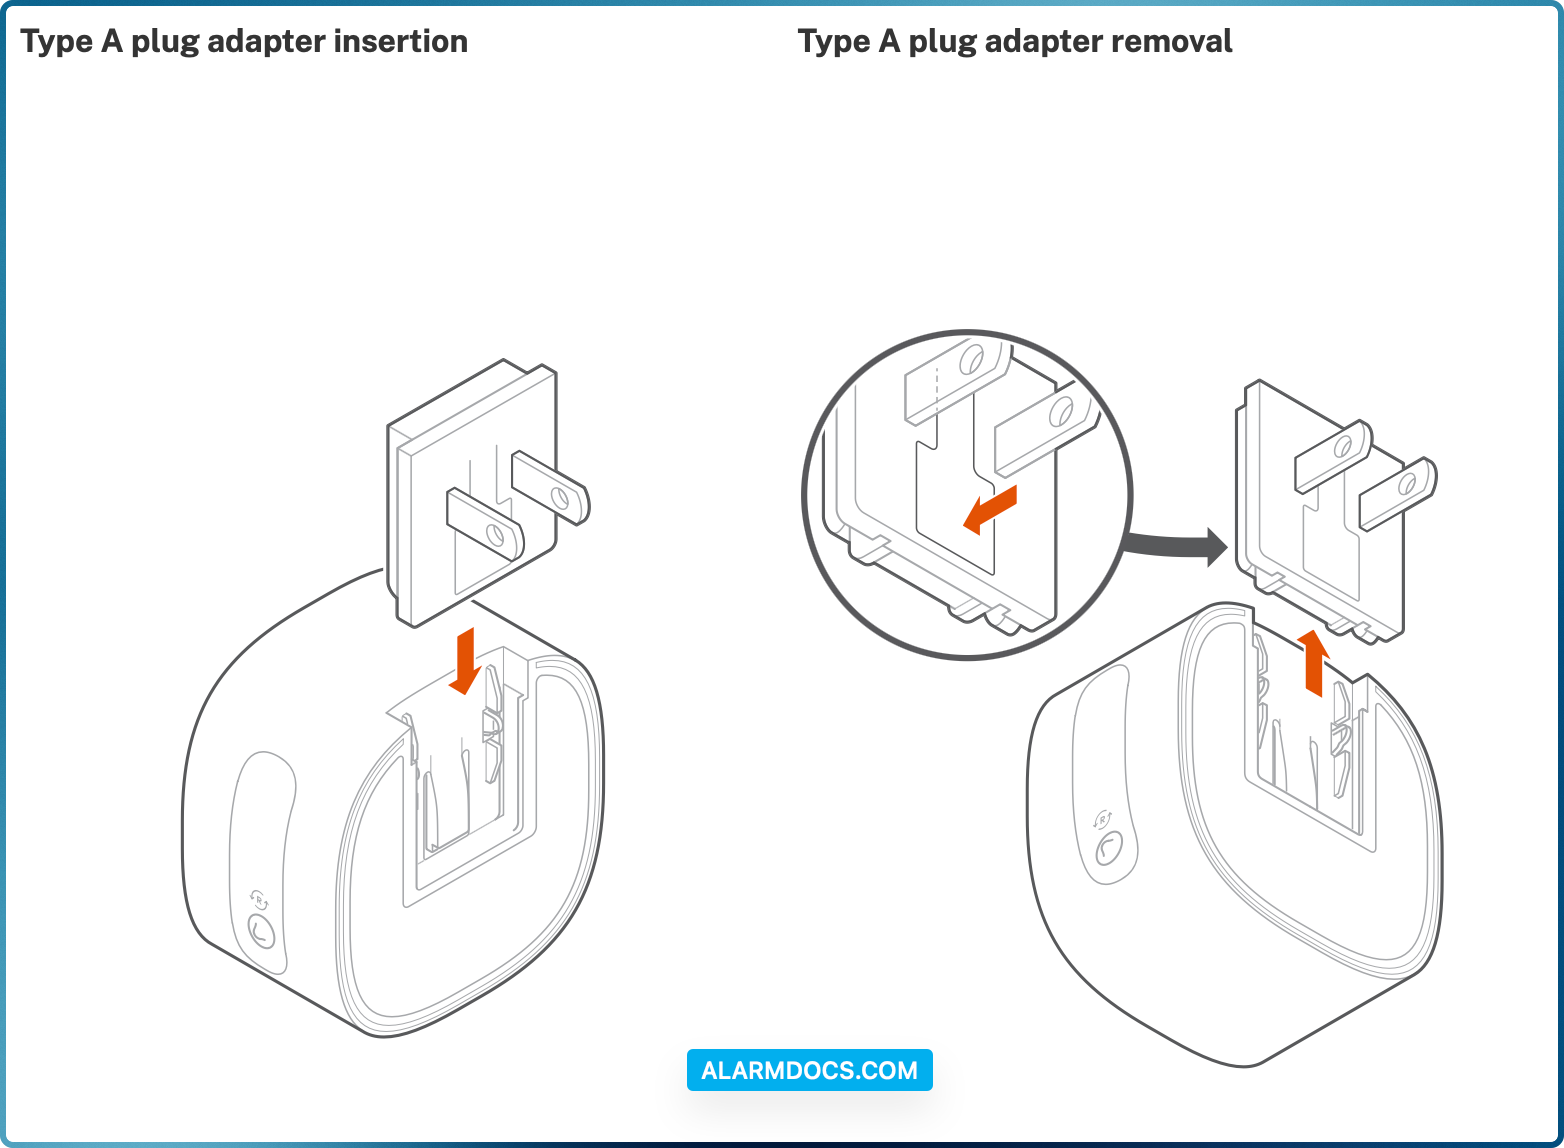
The Wi-Fi Chime’s plug adapter needs to be attached to the device before it can be inserted into an electrical outlet. Select the appropriate plug adapter below to see how to complete that process.
Connect the Alarm.com Wi-Fi Chime to the Wi-Fi network
- Notice for Limited Availability:
- Bluetooth enrollment mode is currently supported when using the Alarm.com app.
- It is possible to use the Partner MobileTech app for Bluetooth enrollment with Log In With Access. To utilize Log In With Access for Bluetooth enrollment mode:
- Log in to the Partner MobileTech app.
- Find the customer account.
- Tap Add Device.
- Tap Wi-Fi Chime.
- Tap Launch Customer App Installation Wizard.
- Tap Log In As User To Mobile App.
- AP enrollment mode is currently supported through the installation tutorial available on the Alarm.com customer website, Alarm.com app, and Partner MobileTech app.
- WPS pairing is not available at this time, but will be coming soon.
The Wi-Fi Chime can be connected to the Wi-Fi network using Bluetooth (BLE) mode on the Alarm.com app or Partner MobileTech app, or Access Point (AP) mode on a compatible computer, tablet, or smartphone.
To ensure sufficient Wi-Fi signal, complete these steps with the chime in close proximity to your router.
1. Plug the Alarm.com Wi-Fi Chime into a non-switched electrical outlet. Wait for the device LED to begin blinking white. If the LED is not white after two minutes, press and hold the Reset button and release when the LED begins to blink white (about 3 seconds).
2. On a Bluetooth-enabled mobile device, log in to the Alarm.com app or Partner MobileTech app and complete the following steps to add the Wi-Fi Chime to the customer’s account.
2. On an Internet-enabled device, connect to the Wi-Fi network ADC-W114C(XX:XX:XX) where XX:XX:XX is the last six characters of the Alarm.com Wi-Fi Chime’s MAC address, located on the device or on the packaging.
3. On the same device, open a web browser and enter http://w114cinstall or 192.168.10.10 in the URL field. Follow the on-screen instructions to add the ADC-W114C to the Wi-Fi network. The LED will be solid green when the connection is complete.
4. Once the LED is solid green, enroll the Wi-Fi Chime to the customer account using the steps in Enroll the Wi-Fi Chime to the account.
Enroll the Wi-Fi Chime to the account
Wi-Fi Chimes can be enrolled to a customer account using the Partner MobileTech app, Alarm.com customer website, or Alarm.com app.
To enroll the Wi-Fi Chime using the Partner MobileTech app:
- Log in to the Partner MobileTech app.
- Find the customer account.
- Tap + Add Device
- Tap Wi-Fi Chime.
- In MAC Address, enter the MAC address.
- Tap Add.
- Enter a name for the device, then tap Continue.
- Follow the on-screen instructions. An installation progress bar displays on the screen.
Once the installation is complete, unplug the chime and install it in its final location.
To enroll the Wi-Fi Chime using the Alarm.com customer website:
- Navigate to the Video Device Setup page by entering the following URL using a web browser: www.alarm.com/addcamera. The customer’s username and password for the account are required to log in.
- If the installation tutorial was used, it automatically navigates to this page after completing the tutorial.
- Enter the MAC address of the Wi-Fi Chime, then click Find.
- Enter a name for the Wi-Fi Chime, then click Install.
- Follow the on-screen instructions to finish adding the chime. An installation progress bar displays on the screen.
Once the installation is complete, unplug the chime and install it in its final location.
To enroll the Wi-Fi Chime using Alarm.com app:
- Log in to the Alarm.com app. You will need the username and password of the account to log in.
- Tap Menu
- Tap Add Device.
- Tap Video Camera.
- Tap Enter MAC Address, then enter the Wi-Fi Chime’s MAC address.
- Tap Install for the Wi-Fi Chime on the Device Found page.
- Enter a device name, then tap Next.
- Follow the on-screen instructions to finish adding the chime. The installation progress displays on the screen.
Once the installation is complete, unplug the chime and install it in its final location.