The 1128 Wireless Glassbreak Detector is a fully-supervised, low current shock and glassbreak sensor that provides detection coverage up to 20 ft from framed glass mounted in an outside wall.
You can mount the 1128 on the ceiling or on an opposing wall for maximum flexibility and coverage. The 1128 operates using the supplied 3 V lithium battery.
PROGRAM THE PANEL
- When programming the 1128 in the panel, refer to the panel programming guide as needed.
- At a keypad, enter 6653 (PROG) to access the PROGRAMMER menu.
- Press CMD until ZONE INFORMATION displays and press a top row select key or area.
- Enter the wireless ZONE NO and press CMD.
- Enter the ZONE NAME and press CMD.
- Select NT (Night or Dy (Day) as the ZONE TYPE.
- Select the AREA NO and press CMD.
- At the NEXT ZN? prompt, select NO and press CMD until WIRELESS? displays.
- Select YES when WIRELESS? displays and press CMD.
- Enter the eight-digit SERIAL# and press CMD.
- Enter the SUPRVSN TIME and press CMD.
- At the NEXT ZN? prompt, select YES if you are finished programming the zone. Select NO if you would like to access additional programming options.
INSTALL THE BATTERY
Keep in mind, when setting up a wireless system, program zones and connect the receiver before installing the included CR123A battery in the transmitter.
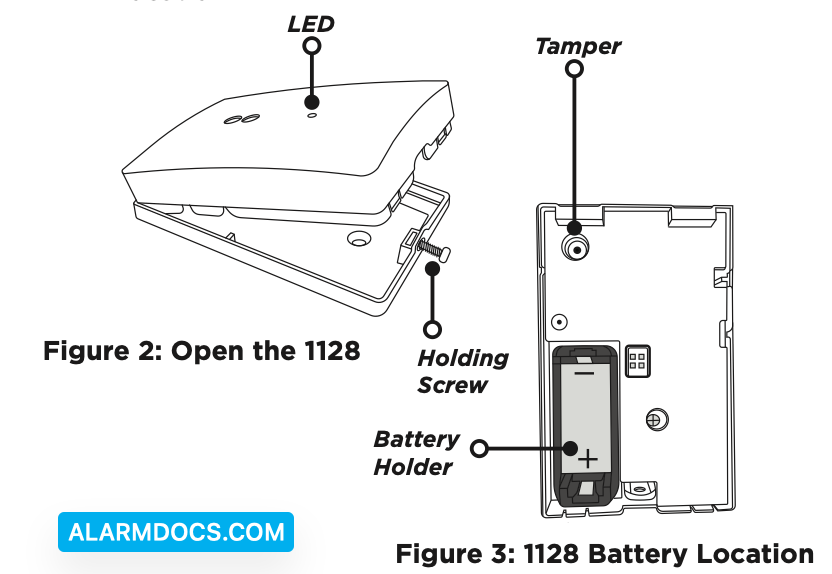
1. Remove the holding screw at the lower end of the 1128 case and gently lift off the cover. See Figure 2.
2. Observing polarity, place the battery in the holder and press into place. See Figure 3 for the battery location.
SELECT A LOCATION
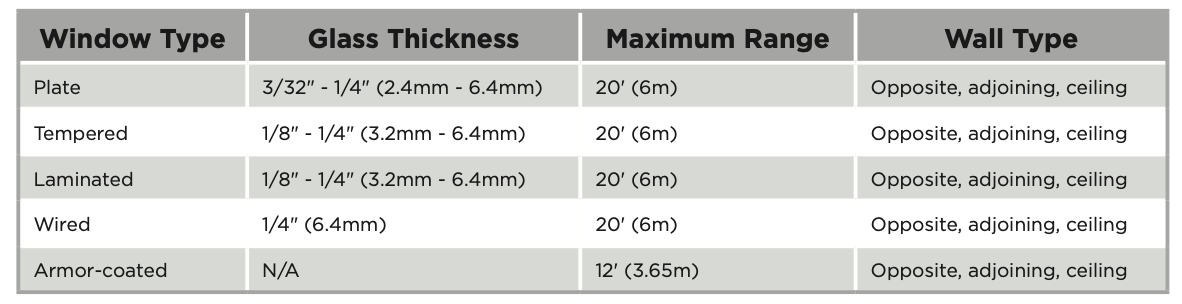
The 1128’s omni-directional detection coverage is measured from the 1128 to the point on the glass farthest from the 1128. Refer to the table below to determine the best location to place the 1128 based on window type, glass thickness, window to wall range, and wall type.
Optimize Detection
To optimize detection, install the 1128 in the following areas:
- Large rooms with low to moderate noise
- In the direct line of sight of all windows that are to be protected
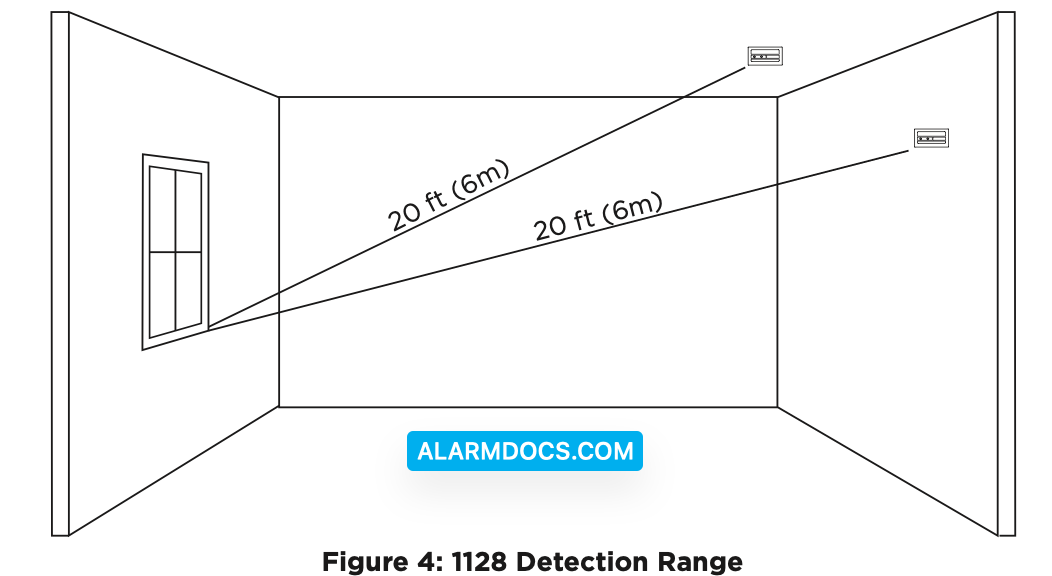
- On the opposite wall of the window that it’s protecting (see Figure 4 for detection range)
Avoid False Alarms
To avoid false alarms, do not install the 1128 in the following areas:
- Rooms with lined, insulated, or dampening drapes
- Rooms with closed, wooden shutters on the inside
- Room corners
- Where white noise (air compressor) is present
- Rooms smaller than 10’x10′
- Rooms with multiple noise sources like televisions, sinks, speakers, etc.
- Excessively humid rooms
Check the Location Using the Survey LED
- Hold the 1128 in the exact desired location.
- Press the tamper switch to send data to the receiver and determine if communication is confirmed or faulty. See Figures 2 and 3 for tamper switch and LED locations.
MOUNT THE 1128
- With the 1128 already open, place the 1128 base on the wall in the desired location.
- Use the provided hardware pack to mount the base to the wall.
- Reinstall the 1128 cover back on to the base and tighten the holding screw.
TEST THE 1128
To test the 1128, use a hand-held tester like the FG-701 to imitate glass breaking.
- Set the tester to flex mode.
- Place the FG-701 near the protected glass and press the button to activate the simulator. It will not annunciate the sound of shattering glass until a low-frequency shock is also generated.
- Generate the appropriate low-frequency shock near the FG-701 (i.e. slamming a framed door) in order to activate the FG-701 simulator.
Glassbreak Walk Test (v2.0.0.1 and higher)
When the 1128 is set into testing mode from the panel, it will trip using the tester only. There is no need to generate shock to trip the detector. XT and XR Series firmware Version 191 is required to perform the glass break walk test.
- Reset the panel.
- Type 8144 (WALK) and select PIR. All 1128s on the system will begin flashing a green LED every 3 seconds to indicate that they are in testing mode. It can take up to 3 minutes for all 1128s to enter testing mode.
- Set the tester to manual mode.
- Place the FG-701 near the protected glass and press the button to activate the simulator. If the 1128 is in range, it will flash the LED red for 3 seconds to indicate it detected the crash.
- The 1128 will remain in testing mode for 30 minutes or until the panel is reset.
Wireless Check-in Test
Perform a Wireless Check-in Test to confirm that the 1128 is communicating clearly with the panel.
- At the keypad, enter 8144 (WALK) and select WLS.
- If the 1128 fails to check in at the keypad, relocate the 1128 or the receiver.
ADDITIONAL INFORMATION
Replace the Battery
- Remove the holding screw and open the 1128 housing.
- Remove the old battery from the holder.
- Observe polarity and insert the new battery in the holder (3 V lithium CR123A battery).
- Replace the cover on the 1128 and secure the housing with the holding screw.